

A trampoline is a somewhat bulky-looking piece of outdoor sports equipment, but installing a trampoline is not as difficult and complicated as we imagine, as long as you follow the step-by-step instructions for proper installation, you can build a safe trampoline for long-term use.
The trampoline does not contain particularly heavy parts, so one person can certainly complete the assembly alone. Of course, two people will be more convenient and quicker to install it, two people need 1-2 hours before you can enjoy the fun brought by the trampoline. For some of these steps, two people to install is recommended.
Necessary Accessories
It is recommended to check if all the accessories are complete after receiving the goods. Trampoline accessories include Frame cover, jumping mat, frame rail, T-connector, spring, leg-extension, W-shaped leg, spring tool-hook, screw, screwdriver, bottom tube, upper tube, Long screw A, nut, plastic pad, enclosure net, sleeve, wrench, screw nut, and long screw B. (Some large-size trampolines will also be equipped with a ladder.)
Trampoline Installation Guide
After confirming that all the required accessories are included, you can start the installation. The installation steps are as follows.
1. Legs Installation
Attaching two leg extensions to W-shaped legs to form U-shaped legs. Using the screws with the screwdriver to fix them. Repeat this action for all legs. (This step is not necessary for the 8ft trampoline)
2. Top Rails Connection
Connect top rails through T-connector until you form a circle. (Tip: With some external force to make the rails right into the place.)
3. Legs & Rails Connection
Two people are recommended to carry out this step. It costs more time for one person. One is responsible for lifting up the top rails, and the other connects the top rails and legs one by one. No matter for one or two people, it is necessary to ensure the locking holes are aligned to keep a most stable connection.
4. Jumping Mat
Then, put the jumping mat inside the frame.
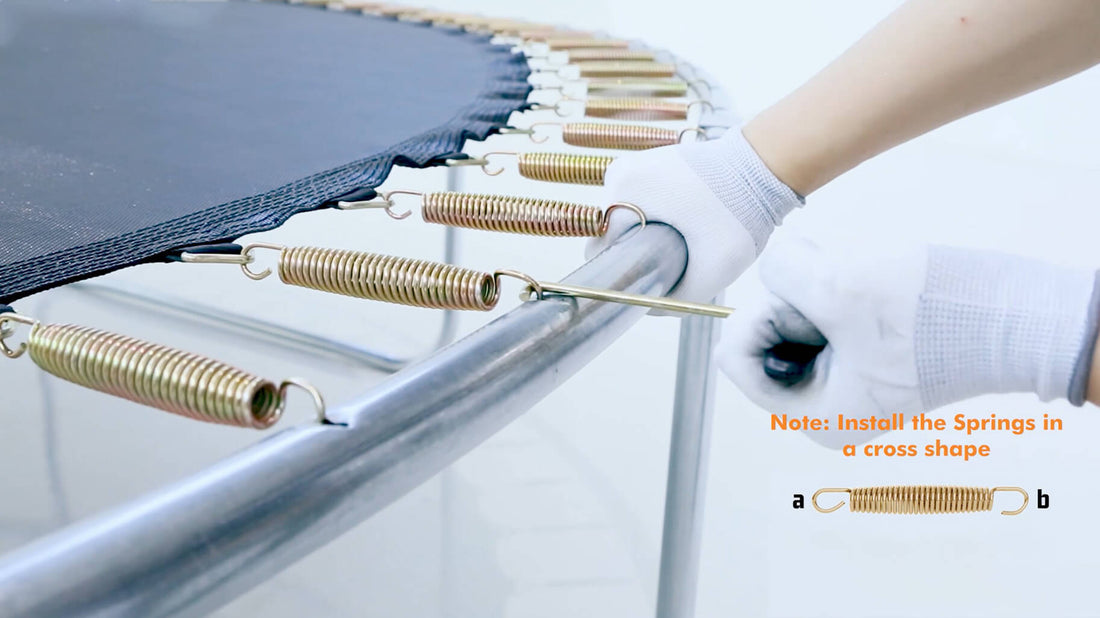
5. Springs Connection
Connect the jumping mat with the top rail tube with springs. First, you need to connect one side of the spring with the jumping mat, then connect the other side with the top rail tube with the help of the Spring Tool.
Considering the elasticity and tension of the springs, it is recommended to install the springs in the order of the opposing sides, so two people are recommended to complete this part together. After this process, the jumping mat is already installed at the same time.
6. Frame Cover
Layout the frame cover to cover all metal parts to avoid injuries.
7. Frame Cover Fixing
Tie the strap under the frame cover to the frame to make sure it settled.
8. Net Enclosure
Until now, the installation of the trampoline is complete. But for more safety, it is necessary to install a net enclosure. It consists of poles and a net. First, you need to cover the poles with foam. In this way, it can reduce the chance of heavy collision with the steel poles.

Then, put the foam-padded poles into each sleeve in the net, and ensure each u-bolt cap has been fitted into a respectively drilled hole on the poles. It's a necessary step to keep the net standing up firmly.

Other Points to Note
If you want to store the trampoline indoors in winter, here are matters that require attention. Remove the trampoline’s jumping mat, the net enclosure, and springs and place them in a dry place indoors to avoid moisture accumulation. The metal frame and poles can be left in the yard.